
Adventure Hike Travel
Get Out There!
Adventure Hike Travel is dedicated to helping you get outside into the great outdoors. Our goal is to connect you to the natural world, equip you for adventure, and inspire you to start your own journey.

Hi, I'm Samantha Panzera. I love taking off on adventures, traveling, and spending lots of time in the mountains. I especially love hiking, backpacking, snowboarding, and rock climbing. I started Adventure Hike Travel to help others get outside into our beautiful world. I aim to inspire, empower, and equip others to start going on their own adventures.


Shop Our Full Adventure Hike Travel Clothing Line
This cool line of outdoor and adventure wear is perfect for anyone who loves hiking, the great outdoors, and getting outside. You can wear it out on your mountain climbing adventures, while camping, rock climbing or just when sitting around the campfire!

Want To Fill Your Life With Adventure?
Join our newsletter for an adrenaline-fueled journey! Receive exclusive updates on travel tips, gear reviews, epic hikes, captivating stories, and inspiration to turn your dreams into reality.
Don't just dream it, live it! Get Out There!
Recent Blog Posts

Melakwa Lake, WA | One of the Best Hikes Near Snoqualmie Pass
If you’re looking for an unforgettable day hike that is a bit of a challenge near Snoqualmie Pass, look no further than Melakwa Lake. Tucked away in the Alpine Lakes Wilderness, this trail delivers a little bit of everything: lush vegetation, sweeping views of the valley below, forests, gorgeous rivers and waterfalls, a natural rock waterslide, rugged rocky terrain, and a jaw-dropping alpine lake framed by dramatic peaks. Melakwa Lake Trail Overview Trail Name: Melakwa Lake via Denny Creek Trail Location: Alpine Lakes Wilderness, WA Distance: Approximately 9.7 miles round trip (based on Gaia GPS) Elevation Gain: 2,967 ft Difficulty: Hard Parking Pass Required: Access with either a Northwest Forest Pass or America the Beautiful Pass Dogs: Allowed on leash Backpacking: Yes, at Established Campsites Trailhead: Denny Creek Trailhead (Exit 47 off I-90) Trail Number: #1011 Maximum Party Size: 12 Region: Snoqualmie Region > Snoqualmie Pass Toliet: Toilet at trailhead Melakwa Lake Trailhead Parking The Melakwa Lake hike begins at the Denny Creek Trailhead, located just off I-90 Exit 47 (Denny Creek/Tinkham Road). This trailhead serves several popular hikes, including Franklin Falls, so parking fills up quickly, especially on weekends and during the summer months. The parking area consists of multiple lots with space for about 170 vehicles total. Despite its size, the lots often reach capacity by mid-morning, so arriving early is your best bet to secure a spot and avoid stress. Important: Roadside parking along Forest Road 58 or near freeway ramps is prohibited, so don’t risk parking illegally if the lots are full. It’s better to have a backup plan or consider an alternate trail. Also, since this is a busy trailhead with multiple access points, double-check trail signs to ensure you’re on the correct route to Melakwa Lake. Parking Pass Required During most of the year, you will need a Northwest Forest Pass or an America the Beautiful Pass to park here. If you don’t have an annual pass, you can purchase a day-use pass online ahead of time and print it out at home-just make sure to display it clearly on your dashboard before hitting the trail. 👉 Purchase a Day Pass Online In the winter months, a Sno-Parks Permit (snow parks permit) is required for parking, as this area is popular for winter recreation as well. If you don’t have a valid pass, there’s an electronic payment station at the trailhead where you can purchase a day permit. Make sure to display your permit clearly on your dashboard, as parking enforcement is active, and fines are issued for violations. Are There Toilets at Melakwa Lake? If you’re wondering about restroom facilities on the Melakwa Lake hike, you’ll find a vault toilet at the Denny Creek Trailhead, perfect for a quick stop before or after your hike. Once you get to Melakwa Lake itself, there’s a very primitive, open-air pit toilet tucked off the lakeside trail to the left. It’s basically just a simple wooden box in the woods-no walls, no roof, just a basic spot to do your business in the…
Read More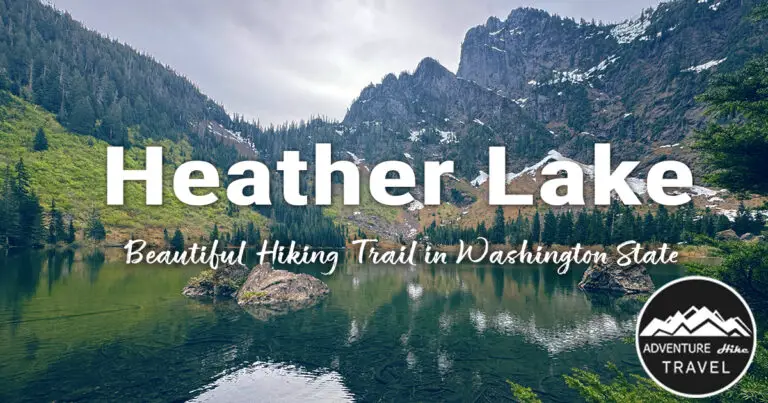
Washington Hikes with Lakes: Don’t Miss Heather Lake
If you’re looking for a short but rewarding hike with lush forest vibes, giant trees, and a peaceful alpine lake at the end, Heather Lake is an awesome choice. Tucked into the slopes of Mount Pilchuck off the Mountain Loop Highway, this 4.7-mile round-trip trail delivers a little bit of everything: waterfalls, wildflowers, old-growth trees, and a lake with serious PNW charm. This trail is a pretty easy to moderate hike with around 1,089 feet of elevation gain. Although short in miles and elevation gain, this trail has a lot of rocks and roots that make it where you really have to watch your step. This hike is absolutely stunning and so worth it-especially if you go early or midweek to avoid the crowds. Heather Lake Quick Trail Facts Trail Length: Approximately 4.7 miles roundtripElevation Gain: Ascend just over 1,089 feet along the routeHigh Point: 2,430 feetDifficulty: Easy to ModerateKid Friendly: Yes, for older kids with trail experienceBest Season: May through OctoberTrail Type: Out-and-Back Trail (optional loop around lake adds ~0.8 miles)Hike Type: Day HikeParking Pass Required: Access with either a Northwest Forest Pass or America the Beautiful PassDog-Friendly: Leashed dogs welcome on the trailTrailhead: North Cascades > Mountain Loop HighwayTrail: Heather LakeTrail Number: #701Maximum Party Size: 12Region: Mt. Baker-Snoqualmie National Forest, Darrington Ranger District SEASONAL ROAD CLOSURE NOTICE: Forest Service Road 42 (Pilchuck Access Road) is rough and may be affected by seasonal closures or conditions. For updates, visit: https://www.fs.usda.gov/alerts/mbs/alerts-notices Heather Lake Trailhead Parking The parking lot at the Heather Lake trailhead is fairly large, but like many popular hikes in the Mt. Baker-Snoqualmie National Forest, it can still fill up on busy summer weekends. That said, it’s often less crowded than nearby Lake 22, making it a great backup plan if your first choice is packed. In fact, that’s exactly what happened to us-the Lake 22 lot was already full, so we pivoted and headed to Heather Lake instead. We were able to easily find a spot, and still enjoyed a beautiful alpine lake hike with forest views, wooden bridges, and boardwalks through lush terrain. If you’re heading out later in the morning or on a weekend, Heather Lake makes a solid alternative without sacrificing scenery or adventure. Parking Pass Required To park at the Heather Lake trailhead, you’ll need to display either a Northwest Forest Pass, an America the Beautiful Pass, or a Day Use Pass. If you don’t have an annual pass, you can purchase a day-use pass online ahead of time and print it out at home-just make sure to display it clearly on your dashboard before hitting the trail. 👉 Purchase a Day Pass Online Are There Toilets at Heather Lake? Yes, there is a vault toilet available at the Heather Lake Trailhead. While it’s a great convenience before or after your hike, keep in mind that there are no restrooms along the trail itself, so be sure to plan ahead. As with any backcountry experience, it’s a good idea to pack out all trash and…
Read More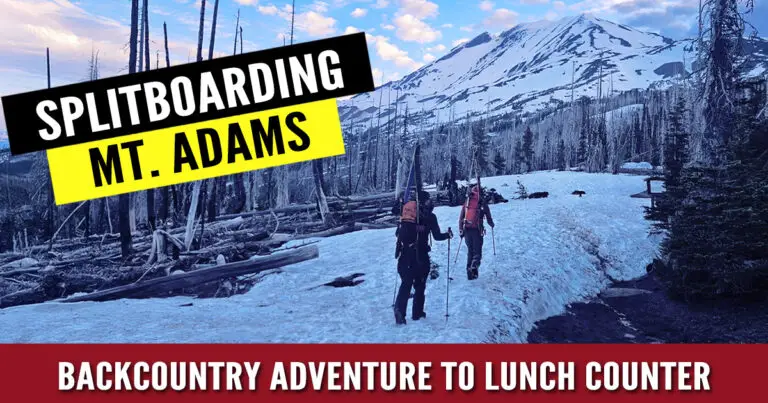
Splitboarding to the Lunch Counter on Mt. Adams
If you’re looking for a spring splitboard adventure with jaw-dropping views, endless snowfields, and an amazing descent, Mt. Adams delivers. The route to the Lunch Counter via the South Climb trail is a classic among backcountry riders-and now we know why. In this post, I’ll walk you through the route we took and a firsthand look at our own attempt to summit Mt. Adams in a single day (spoiler: things didn’t quite go as planned… but the turns were still epic). 🏔️ Quick Trail Stats Trailhead: Cold Springs Campground (~5,555 ft) Lunch Counter Elevation: ~9,300 ft Elevation Gain: ~3,700-3,800 ft One-Way Distance to Lunch Counter: ~5-6 miles Best Time to Ride: Late May to early July Permit Required: Cascade Volcano Pass for travel above 7,000 ft (May-Sept) Directions from Seattle to Mt. Adams South Climb Trailhead Start your journey by heading to Cold Springs Campground, the main access point for the South Climb route. Depending on the snow year, the road may be snow-covered several miles from the actual trailhead early in the season, so check conditions before you go. You’ll need a high-clearance vehicle if snow levels are still low but passable. Total Time: ~4.5-5.5 hoursDistance: ~215 miles Take I-5 South → I-205 South (bypass Portland). Exit onto WA-14 East toward White Salmon. In White Salmon, take WA-141 North to Trout Lake. From Trout Lake: Take FR 23 → Right on FR 80 → Left on FR 8040 Drive ~4.5 miles to Cold Springs Campground / South Climb Trailhead Trailhead GPS: 46.1430° N, 121.4941° W Note: Last few miles may require high-clearance vehicle or walking if snow-covered.Permits required above 7,000 ft (Cascade Volcano Pass). The Start of the Journey We kicked things off by loading the car and grabbing our crew-Andrew, Jason, and myself (Robert from Adventure Hike Travel). Our goal? Drive down to Mt. Adams, camp at the trailhead, and hit the summit in a single day via the Southwest Chutes. We knew snow still blocked parts of the road, so we were hoping we could get close to the upper trailhead. Fortunately, the snow had melted just enough for us to drive most of the way. Our plan was to sleep at the lower trailhead, then move up in the morning to start our climb. But here’s where things started going a little sideways… We had planned to hit the trail at 4:00 AM, but the logistics of moving camp from the lower to upper trailhead ate up time. Between packing up, driving, and reorganizing our gear, we didn’t get moving until 5:50 AM-almost two hours later than planned. Lesson learned: if you want a true alpine start, camp where you plan to start. 🛠️ When Everything Starts to Break It didn’t take long before gear issues started stacking up. Jason’s ski pole snapped while we were still at the car, leaving him to climb with only one. Not ideal, especially on steeper terrain. Andrew’s splitboard binding had a missing rivet. He had to improvise a fix…
Read More
Why Splitboarders Love Burton’s GORE-TEX Vent Snow Pants (And I Do Too)
When it comes to choosing the right men’s snow pants for splitboarding or snowboarding, the Burton GORE-TEX Vent Pants hit that sweet spot between performance, comfort, and price. These pants are packed with rider-focused features – full GORE-TEX waterproofing, tons of ventilation, fleece-lined pockets, and a design that actually moves with you on the mountain. Whether you’re skinning uphill, dropping into a line, or just cruising laps at the resort, these are the kind of snow pants that make your day easier and drier – no gimmicks, just solid gear that works. View on Amazon First Things First: GORE-TEX, Baby These pants are full GORE-TEX, which is a game-changer. Keeps you dry even when it’s dumping snow or you’re sweating it out on the uptrack. The waterproofing is legit, and they’re windproof too. “They are GORE-TEX – number one, that’s super awesome. It’s gonna keep you dry.” Seriously, that alone makes these pants a win. Venting On These Snow Pants Is Amazing for the Backcountry Now here’s where the Burton GORE-TEX Vent Pants really shine – venting. These pants have vents on the sides and through the middle. You can unzip them all the way and get solid airflow when you’re skinning uphill or just hiking around. “You really get that crossflow for the uptrack.” You can dump heat fast, and then zip ’em back up when it cools down. Keeps you dry inside and out. Amazing Pockets: Great For Splitboarders Who Love The Backcountry You’ve got 6 pockets total: Zippered hand pockets with soft fleece lining (aka built-in hand warmers) Cargo pockets on the thighs with taped seams Two zippered pockets on the back “These inner ones have a fleece liner. That’s kinda like your hand-warmer pocket.” Perfect for stashing your snacks, tools, or whatever else you carry. Designed for Snowboarders Who Actually Ride and Dont Just Hang In the Lodge All Day These Burton GORE-TEX Vent Pants aren’t just waterproof – they’re designed to ride hard: Zippered cuffs make boots easy to get on/off Cinch cords at the gaiters to keep snow from creeping in Internal waist adjustment and belt loops Jacket-to-pant connectors for your powder skirt Stretchy crotch gusset for easy movement Basically, you’ve got comfort and function dialed in. Solid Price for What You Get These Snow Pants go for around $200 to $300, depending on where you grab them. For full GORE-TEX, taped seams, and all these features, that’s a steal. “You’re not gonna find a GORE-TEX pant that’s cheaper with this amount of airflow and features.” And just FYI, I bought these with my own money. No sponsorships here – just sharing what works. Final Take If you’re looking for a do-it-all snow pant that can handle everything from backcountry splitboard tours to resort laps, the Burton GORE-TEX Vent Pants are 100% worth considering. They’re waterproof, breathable, packed with rider-friendly features, and surprisingly affordable for what you get. Whether you’re splitboarding, snowboarding, or just want to stay warm and dry in unpredictable mountain weather…
Read More
Why I Love The Jones Dream Catcher Splitboard For Backcountry Adventures
If you’re looking for a versatile, fun, and dependable splitboard for your next backcountry trip, let me introduce you to one of my all-time favorite setups: the Jones Dream Catcher Splitboard. This board has been with me through deep powder days, icy early mornings, and everything in between-and it continues to impress me season after season. Whether you’re just getting into splitboarding or you’re looking to upgrade your setup, the Dream Catcher is a solid choice that offers the perfect balance of performance, float, and playful flexibility. In this post, I’ll share why I keep coming back to this board, what makes it stand out in the backcountry, and a bit of my personal journey with it over the years. Watch the Gear Review Scroll down to watch my full video review on why this board is my go-to choice for backcountry splitboarding adventures. My Splitboard Story Hey, I’m Samantha Panzera with Adventure Hike Travel. I’m no pro snowboarder-just an average rider who gets out on the mountain often 18+ times a season (when not injured, haha) and absolutely loves it. Over the years, I’ve tried a handful of different boards, but nothing has compared to the Jones Dream Catcher. I first bought the resort version of the Dream Catcher back in 2018, and I’ve been obsessed with it ever since. When it came time to get a splitboard for backcountry riding, I tried something different-but honestly, it felt like a total downgrade. It didn’t have the same responsiveness or float, and it just didn’t click with me. Then, by sheer luck, I found a slightly used Jones Dream Catcher splitboard on Facebook Marketplace. It was the exact model I loved-just in splitboard form. I snatched it up immediately, and I’ve never looked back. This board floats beautifully in powder, is super responsive in mixed terrain, and handles backcountry lines like a dream. After seven seasons of riding the Dream Catcher in both resort and splitboard versions, I can confidently say it still blows me away every time I ride. What Makes the Dream Catcher So Special? Here are some of the reasons why I absolutely love this snowboard. It Floats Like a Dream in Powder One of my absolute favorite things about the Jones Dream Catcher Splitboard is how effortlessly it floats in powder-and I mean effortlessly. There’s something almost magical about the way this board glides through fresh snow. The directional rocker profile and spoon-shaped nose and tail work together to give it a smooth, surfy feel that makes powder days feel like a dream. Before I got this board, I really struggled to keep the nose of my board up-especially in deeper snow. With some of my other snowboards and my previous splitboard, I felt like I was constantly fighting the board just to stay on top of the powder. And after I had ACL surgery on my right knee, that kind of struggle became even more frustrating. My knee was still a little…
Read More
Best Men’s Splitboard for the Backcountry? Nitro Doppleganger Review
Backcountry riders know that the right splitboard can make or break a tour. You need something lightweight and responsive for the uphill-but also stable, dependable, and capable of handling a wide range of conditions on the way down. The Nitro Doppleganger strikes that balance. With its directional shape, carbon reinforcements, and Nitro’s Cam-Out Camber profile, it delivers confident edge hold on steep climbs and powerful carving performance on descents. This board is hands down built for adventure-from long tours on the skin track to gliding effortlessly through deep powder. In this review, I’ll break down the specs, share how it rides, and explain what kind of rider will get the most out of the Doppleganger. If you’re looking for a touring-focused splitboard that doesn’t sacrifice downhill performance for weight savings, this one deserves a serious look. First Impressions: Lightweight But Built Like a Tank Right out of the box, the Nitro Doppleganger feels built for adventure. The board is incredibly lightweight (thanks to its Koroyd® Power Core) yet stiff and stable where it counts. This is exactly what you want in a splitboard: something light enough for the uphill grind, but strong and responsive enough for powerful descents. What Makes the Nitro Doppleganger a Top Splitboard Pick? Koroyd® Power Core – Light, Strong, and Smooth When you’re earning your turns, every gram counts. The Koroyd® Power Core is about 70% lighter than traditional balsa, cutting serious weight without giving up strength. Its honeycomb structure doesn’t just keep things light-it also soaks up chatter, giving you a smoother, more controlled ride in variable snow. Whether you’re skinning all day or dropping into tight trees, this core helps you stay fast, confident, and ready for more. Diamond Laminates – Built for Snap and Precision The Diamond Laminates in the Nitro Doppleganger are made from carbon fiber layers designed to deliver serious snap and responsiveness. This means the board feels lively and energetic beneath your feet, giving you that extra pop when you need it. These carbon layers really come into their own on steep descents, where edge control and stiffness are crucial. They help the board maintain stability at high speeds and keep your edges locked in, ensuring precise turns and maximum confidence on challenging terrain. Cam-Out Camber Profile The Nitro Doppleganger is a setback directional board with a Cam-Out Camber profile-basically a traditional camber that blends into early rise in both the nose and tail. That gives you reliable edge hold on the skin track and descents, but still feels playful and floaty in deeper snow. The early rise starts right around where the nose begins to lift, and while it’s not an aggressive rocker, it has that same smooth, gradual kick you’ll find on boards like the Orca. Pair that with a shorter tail, and it naturally helps the nose stay up while your tail sinks just enough into the powder-perfect for deep snow riding without feeling like you’re fighting the board. This profile is especially nice when you’re riding…
Read More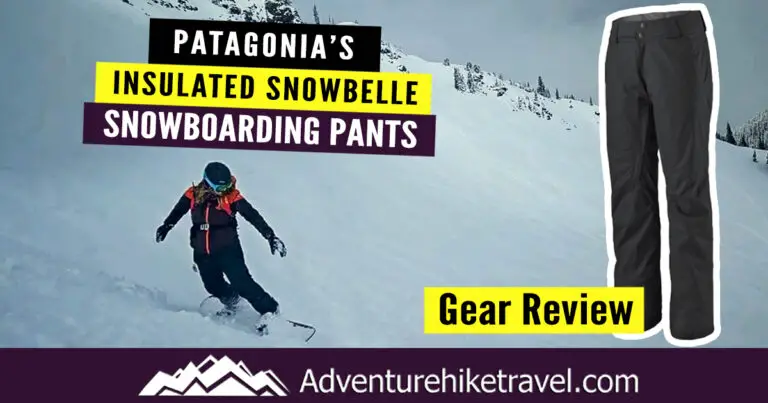
Why Patagonia’s Insulated Snowbelle Snowboarding Pants Are the Best I’ve Tested
I’m no pro snowboarder, but as an avid rider who often spends 18+ days on the slopes each winter, I’ve had my fair share of experiences in every condition imaginable – from pouring down rain to -14°F days on the mountain and deep powder. Over the years, I’ve learned that the right gear can make or break your day on the mountain, and snowboarding pants are at the top of that list. After testing many different pairs, I can confidently say that Patagonia’s Insulated Snowbelle Snowboarding Pants have become my go-to choice. These pants offer everything you need for long days in all kinds of weather: warmth, comfort, and performance. Here’s why I think they’re the best I’ve ever worn. Disclaimer: I purchased these Patagonia snow pants from REI with my own money and am sharing my honest experience using these pants in case you’re considering them too. Looking to score deals on Patagonia snow pants? Hit up REI’s promo codes or get the latest savings on Patagonia gear here. 1. Warmth Without Sacrificing Movement – Why These Pants Work for Snowboarders One of my top favorite features of the Insulated Snowbelle Pants is their ability to keep you warm in the harshest conditions. I’ve had the opportunity to test these pants in temperatures as low as -14°F during a snowboarding trip in the Canadian Rockies. Paired with leggings underneath, these pants helped me stay out in freezing temps all day long, ensuring I didn’t bail on a trip I had booked months in advance. Over the years, these snowboarding pants have done an amazing job of keeping me cozy during crazy snowstorms. Whether riding down the mountain or sitting on the chairlift, they consistently held up against the cold, helping keep me warm and able to ride longer. On powder days, the Insulated Snowbelle Pants really shine. They maintain warmth without adding that unnecessary bulk, allowing for free movement while tackling deep snow. They use Primaloft® insulation, and when combined with the durable outer layers, they do a fantastic job of keeping you warm and dry. I also like the little clip on the pant leg that I can secure to my boot to help prevent snow from going up the pant leg. Whether battling heavy snowstorms or enjoying fresh powder, these pants are awesome! I love that they offer just the right amount of insulation – warm enough to handle freezing mountain temps, but without the bulky, restrictive feel that some snow pants have. 2. Waterproof and Breathable GORE-TEX® Fabric Okay, let’s talk about how amazing the GORE-TEX® waterproofing is on these pants. Seriously, this is one of the main reasons I love the Insulated Snowbelle Pants so much – because of how seriously waterproof they are. I learned this the hard way during a backcountry splitboarding adventure in Olympic National Park. I spent five hours hiking through a crazy mix of rain, snow, and everything in between. My rain jacket by another brand…
Read More
Why Tulip Town Is a Must-See Stop During the Skagit Valley Tulip Festival
If you’re planning a springtime getaway to Washington State, Tulip Town in Skagit Valley should be at the top of your list. Renowned for its stunning displays of vibrant tulips, this farm is one of the standout attractions of the Skagit Valley Tulip Festival, which takes place every April. Whether you’re a flower enthusiast, a photography lover, or someone who just enjoys the simple beauty of nature, Tulip Town is a must-see stop that promises to make your visit unforgettable. Tulip Town at a Glance 🌷 Acres of Tulips: 6 vibrant acres of colorful blooms 🌷 Tulip Varieties: Over 50 stunning types to explore ✅ Free Parking 🐾 Pet-Friendly: Leashed pets welcome ♿ Accessible: Designed with special needs accessibility in mind 🛍️ Gift Shop: Tulip-themed treasures and keepsakes 🍽️ Food Available: Enjoy snacks, meals, and treats on-site 🧺 Picnic & Seating Areas: Relax and take in the view 👨👩👧👦 Family-Friendly: Fun for all ages! A Sea of Color and Beauty Tulip Town is a 30-acre farm renowned for its breathtaking tulip fields-over 6 acres bursting with more than 50 vibrant tulip varieties. From the moment you arrive, you’re immersed in a kaleidoscope of color. Rows upon rows of tulips stretch into the distance, showcasing every hue imaginable-from soft pastels to fiery reds, oranges, and purples-all set against a backdrop of blue skies and the snow-capped peaks of the Cascade Mountains. Adding to the charm, a classic red barn sits nestled among the fields, offering a rustic focal point for your photos. To one side, the majestic Cascades and Mount Baker rise in the distance, while the Olympic Mountains frame the opposite side-creating a panoramic view that’s nothing short of stunning. Whether you’re a passionate photographer or simply enjoy wandering through gorgeous gardens, Tulip Town is designed to inspire. The fields are thoughtfully laid out with clear walking paths and informative signs identifying each tulip variety-from the classic single-stemmed tulips to the dramatic, ruffled parrot tulips and lush, peony-like double tulips. One of my favorites was the pink and white Finola tulips-so elegant and unique. What surprised me most was how much I learned while strolling through the fields. I had no idea there were so many types of tulips, each with their own personality and charm. Tulip Town isn’t just beautiful-it’s a truly memorable spring experience. Tulip Town Pricing Here’s what’s included with general admission and how much tickets cost for each age group: General Admission (Ages 12+): $15.00 + $2.37 service feeIncludes: Parking & entry to Tulip Town Access to unique photo ops throughout the fields Trolley ride through the tulips (weather dependent) Specialty food & espresso options Access to the beer & wine garden Kids Admission (Ages 6-11): $10.00 + $2.20 service feeIncludes: Parking & entry Fun photo opportunities Trolley ride (weather dependent) Access to food & drink vendors Seniors (65+) & Military: $12.00 + $2.27 service feeIncludes everything in adult admission, plus: Discounted rate as a thank-you to seniors and those who serve! Children 5 & under…
Read More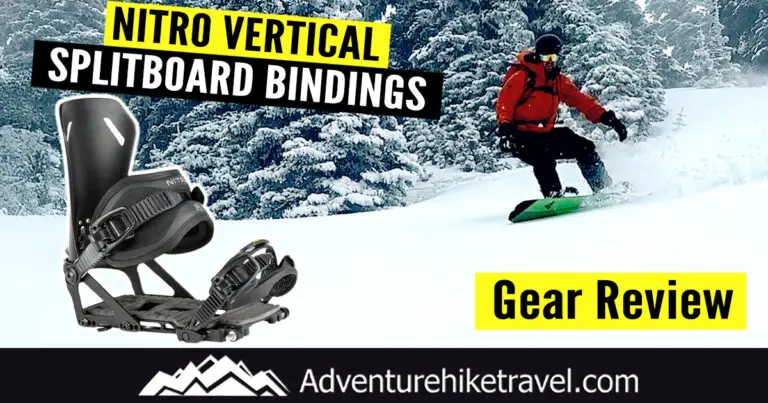
The Best Splitboard Bindings? Nitro Vertical Splitboard Bindings Gear Review
For backcountry snowboarders, choosing the right gear is a necessity. When you’re navigating rugged terrain and unpredictable conditions, your bindings need to be reliable, comfortable, and quick to transition between touring and riding modes. In this gear review, I’m diving into the Nitro Vertical Splitboard Bindings: a sleek, performance-focused option built for riders who crave versatility and control in the backcountry. But do they live up to the hype? Let’s find out.
Read More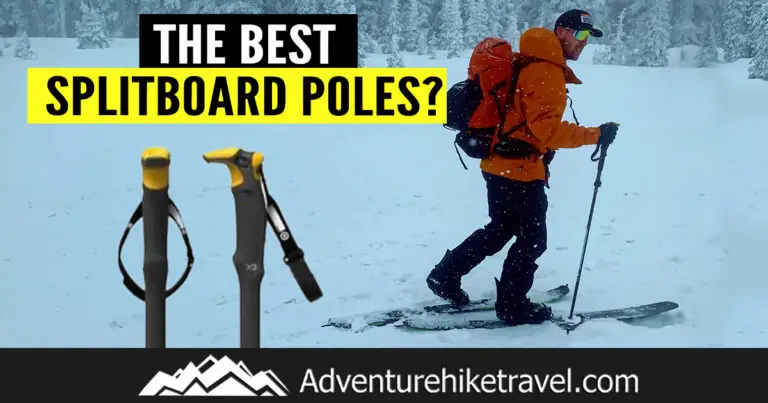
The Best Splitboard Poles? G3 Pivot Trek Poles Review
When you’re heading into the backcountry on a splitboard, the right gear makes all the difference—especially your poles. A solid set can boost your efficiency on the skin track, give you stability during transitions, and pack down small when it’s time to ride. That’s one of the reasons I’m really loving the G3 Pivot Trek Poles. They’re durable, lightweight, and super packable—clearly designed with splitboarders in mind. While there might be better options out there for skiers, these poles are a standout pick for anyone splitboarding who values convenience and reliable performance.
Read More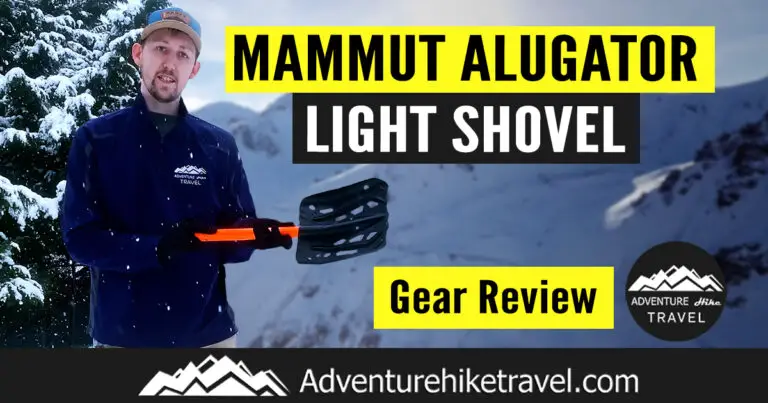
The Mammut Alugator Light Shovel: A Must-Have For Backcountry Skiers & Splitboarders
When venturing into the backcountry, having the right avalanche safety gear is essential. A high-quality shovel is a critical part of any backcountry skier or splitboarder’s kit, and the Mammut Alugator Light Shovel is one of the best options available. Designed for strength, efficiency, and portability, this lightweight and compact shovel is a must-have for those who prioritize safety without adding unnecessary weight to their pack. Why the Mammut Alugator Light Shovel Stands Out The Mammut Alugator Light is built with high-end materials and innovative design features that make it a top choice for avalanche preparedness. Here’s why this shovel is an essential addition to your backcountry gear: Mammut Alugator Light Lightweight & Compact Weighing only 475 grams, the Alugator Light is designed to be ultra-light yet highly durable. The space-saving blade design allows it to fit into small backpacks, ensuring it won’t take up unnecessary space while you’re on the move. Durable & Strong Made from hardened, anodized aluminum, the Alugator Light offers excellent rigidity and strength. The stabilization ribs provide maximum stability, and the sharpened, tilt-resistant blade is built for cutting through dense snow and ice with ease. Additionally, the straight blade back is perfect for cutting precise snow profiles, making it a great tool for snow analysis. Fast & Efficient Assembly In an emergency, every second counts. The oval-shaped telescopic shaft ensures quick deployment, and the automatic spring lock allows for fast, precise guidance during assembly. This feature ensures you can have the shovel ready for use in seconds, whether you’re digging out a buried companion or constructing a snow shelter. Ergonomic Handling Shoveling snow can be exhausting, but the symmetrical T-grip on the Alugator Light is designed for optimum energy transfer. This means more efficient digging with less fatigue, which is crucial in an avalanche rescue situation. Versatile & Multi-Functional Beyond just digging, the Alugator Light has attachment holes that allow it to be used for building a snow anchor or a rescue sled, adding even more value to this essential piece of gear. Mammut Alugator Light Key Specifications Weight: 475 g Blade Width: 21 cm Blade Length: 24 cm Collapsed Shaft Length: 37 cm Extended Length: 75 cm Collapsed Length: 54 cm Certification: UIAA 156 avalanche shovel standard Final Thoughts If you’re a backcountry skier or splitboarder looking for a lightweight, durable, and efficient avalanche shovel, the Mammut Alugator Light is an excellent choice. Its compact design, strong construction, and easy handling make it one of the best shovels on the market for avalanche safety. Whether you’re heading out on a ski tour or deep into the backcountry, having this shovel in your pack could make all the difference in an emergency situation. Stay safe, be prepared, and enjoy your backcountry adventures with the Mammut Alugator Light Shovel! Shop Now Want To Fill Your Life With Adventure? Join our newsletter for an adrenaline-fueled journey! Receive exclusive updates on travel tips, gear reviews, epic hikes, captivating stories, and inspiration to turn your dreams into reality. Don’t…
Read More
Gear Review: BCA Stealth 300 Carbon Avalanche Probe For Backcountry Safety
When you’re out on the slopes or exploring the backcountry, avalanche safety is non-negotiable. One essential piece of gear that every backcountry skier and splitboarder should have is a reliable avalanche probe. In this review, we’re diving into the BCA Stealth 300 Carbon Avalanche Probe-a must-have tool that’s designed to help you stay safe when venturing into avalanche terrain. Here’s why this probe is worth considering for your avalanche safety kit. BCA Backcountry Access Stealth 300 Carbon Avalanche Probe Why Choose the BCA Stealth 300 Carbon Avalanche Probe? The BCA Stealth 300 Carbon Avalanche Probe is an amazing option for anyone who spends time in deep snowpacks or avalanche-prone areas. Whether you’re a seasoned pro or a passionate backcountry enthusiast, this probe is designed to help if an avalanche should happen. BCA Backcountry Access Stealth 300 Carbon Avalanche Probe Key Features of the BCA Stealth 300 Carbon Avalanche Probe: Size & Weight:At 300 cm (118 inches) in length, this probe is long enough to reach deep snowpacks, making it ideal for professionals and serious adventurers. Despite its extended length, it weighs only 10.2 oz (290g), which is impressively lightweight for the level of performance it offers. This makes it a great choice for skiers and splitboarders who want to keep their pack weight to a minimum without sacrificing functionality. Fast Assembly & Deployment:One of the standout features of the BCA Stealth 300 is its fast assembly, ensuring you’re ready for action when every second counts in an avalanche rescue. The Quick-Lock hardware system is engineered for rapid deployment, allowing you to extend the probe in record time. With no loose cables to cause hangups, this probe eliminates delays and ensures smooth assembly every time. Innovative Design for Packability:The top segment of the probe nestles inside the next section, reducing the overall size when collapsed. At only 17.0 inches (43 cm) when packed down, it fits easily in your backcountry pack, leaving more room for other essential gear. Laser-Etched Depth Markings:The laser-etched depth markings on the probe make it easy to measure snowpack depth and victim location, so you can quickly assess how deep to dig during a rescue operation. This ensures you’re able to accurately estimate the excavation area and make the right decisions when it matters most. Durability and Reliability:Built with carbon fiber construction, the BCA Stealth 300 Carbon Probe is lightweight yet incredibly strong. Its rugged design ensures it can withstand the toughest backcountry conditions and perform reliably in a rescue scenario. BCA Backcountry Access Stealth 300 Carbon Avalanche Probe Perfect for Backcountry Skiers and Splitboarders If you’re a backcountry skier or splitboarder, the BCA Stealth 300 Carbon Avalanche Probe is a game-changer. Not only is it lightweight and easy to carry, but it’s also incredibly effective when you need it most. In the event of an avalanche, the ability to deploy your probe quickly and efficiently could be the difference between life and death. Whether you’re navigating through deep snow or working in remote terrain, this probe’s…
Read More